In the high-stakes world of digital product design, a silent killer of user research lurks in plain sight: the artificial pause. During almost any usability testing session, a telling moment inevitably arrives. A participant lands on a login screen, enters a string of characters into an input field, and glances up, looking for subtle cues to confirm whether they are “doing it right.”
That split-second hesitation is a massive red flag. It is the exact moment the participant realizes they are interacting with a simulation rather than a functional piece of software. From that microsecond onward, the psychological contract of the test session is broken. Every data point, reaction, and interaction metric collected subsequently is tainted by that underlying awareness. The user is no longer behaving with the uninhibited cognitive load of a real customer; they are navigating a demonstration.
Nowhere is this credibility gap more pronounced than in financial technology (FinTech). Banking and financial services customers are hyper-vigilant by nature. Trained to spot anomalies—a balance that fails to reconcile, an input field that accepts arbitrary strings without validation, or a sluggish transition—they will routinely interrupt a user test to flag broken functionality. Consequently, product teams walk away with qualitative and quantitative findings that reflect how users behave in a controlled, superficial demonstration rather than in the wild.
The solution, however, is remarkably targeted. Rather than expending hundreds of engineering hours building out an entire backend infrastructure, product designers can focus on a single, critical juncture where user trust is established or shattered: the authentication flow.
By leveraging advanced no-code prototyping tools like ProtoPie, designers can construct fully reactive login systems—complete with credential validation, live error states, and native-grade biometric animations—without writing a single line of production code. This in-depth tutorial and strategic overview examine how building a login that behaves like a shipped product transforms qualitative research, elevates stakeholder alignment, and sharpens engineering handoffs.
Detailed Chronology: Step-by-Step Blueprint for a Production-Grade Login Prototype
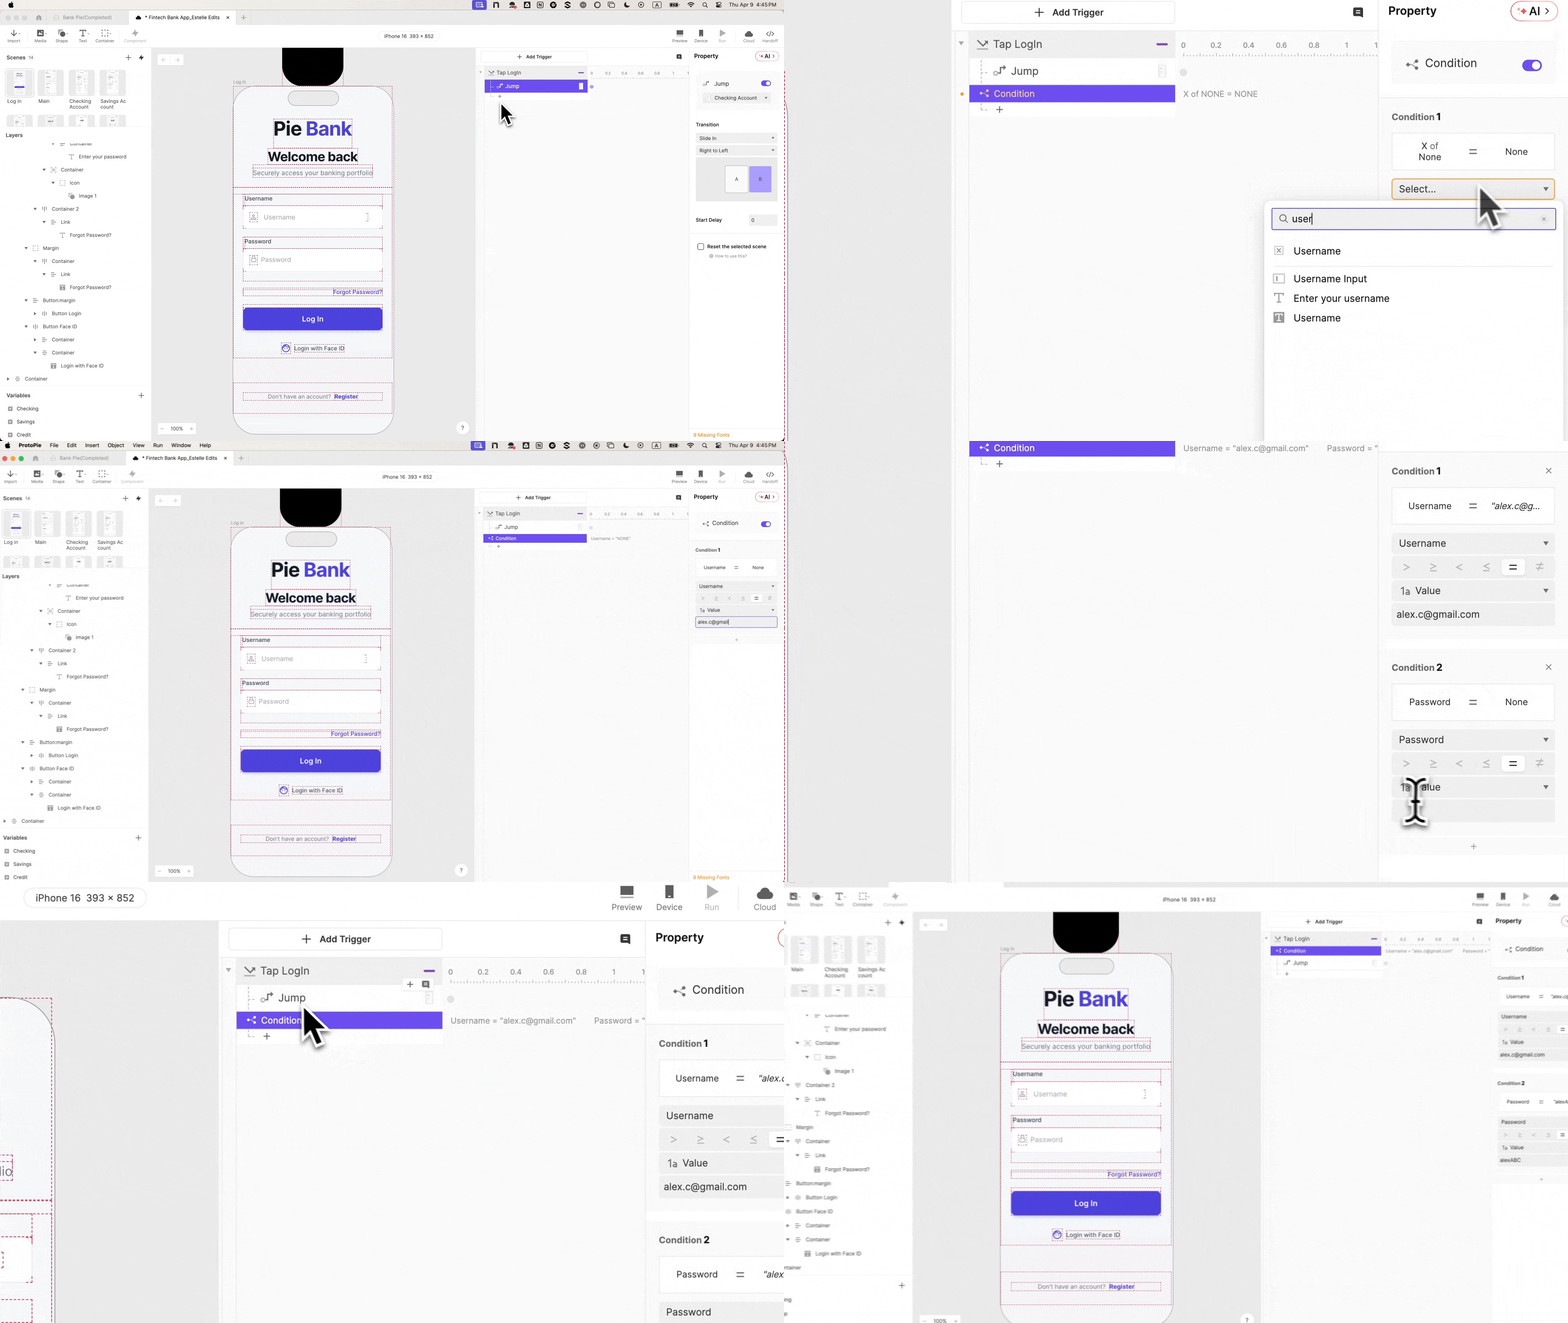
To demonstrate how to eliminate the fidelity gap, we examine the construction of Pie Bank, a model mobile banking prototype. By implementing functional inputs, robust variables, conditional logic, and micro-interactions, designers can transition from a passive mockup to an interactive environment that passes the ultimate test of user suspension of disbelief.
[Figma Design Import]
       │
       ▼
[Native Input Fields & Text Masking]
       │
       ▼
[Variable Binding & Real-Time Data Capture]
       │
       ▼
[Conditional Logic & Live Error State Engine]
       │
       ▼
[Biometric Animation & Staggered Timing Sequence]
Step 1: Importing from Figma with Structural Integrity
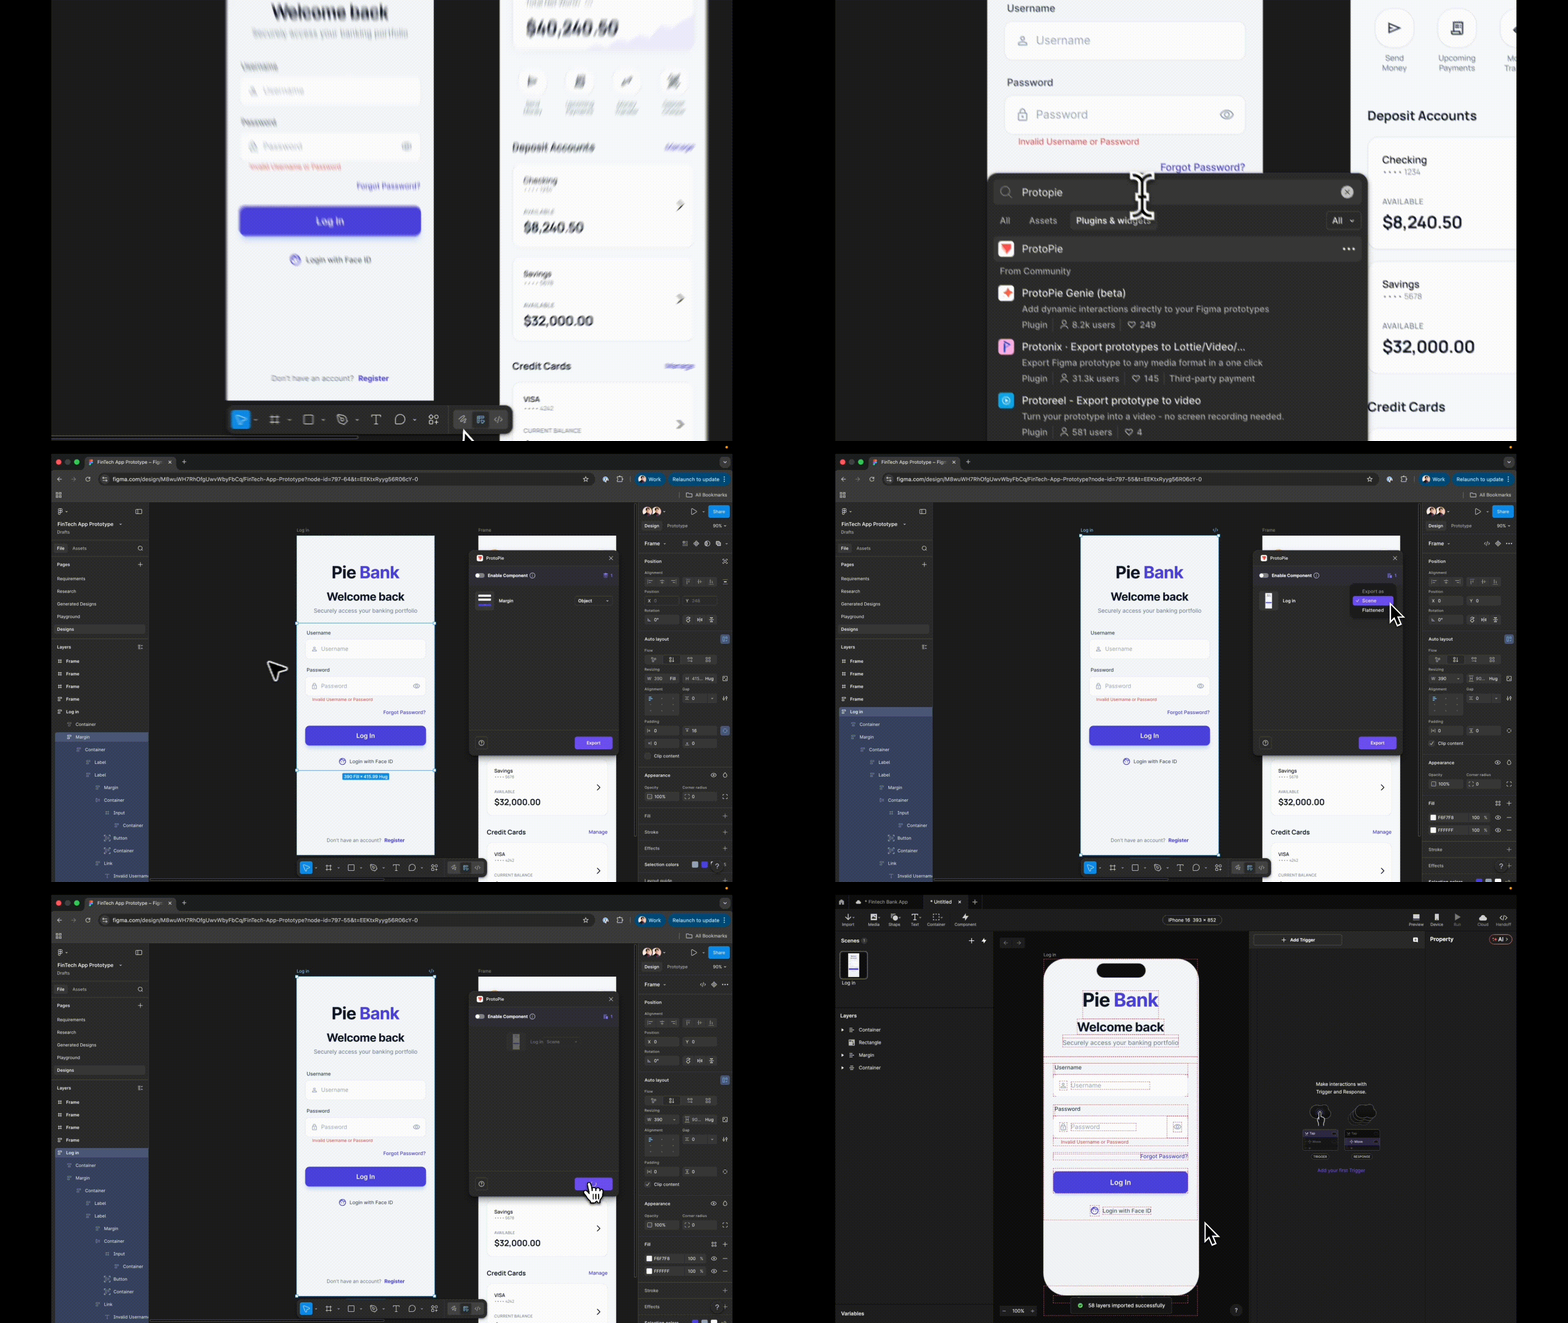
The foundation of any high-fidelity prototype begins in the design phase. When bringing assets over from Figma using the ProtoPie plugin with a login frame selected, designers must deliberately choose Scene rather than Flattened during export.
Flattening collapses the user interface into a single, static image file, stripping away individual layer properties. Choosing "Scene," conversely, preserves the complete layer hierarchy. Every button, container, text label, and input field arrives in ProtoPie as an independent, targetable layer.
Crucial Best Practice: Before proceeding further, nomenclature matters. Renaming layers logically—such as Input Username instead of the default Rectangle 14—prevents hours of debugging later. Vague layer names compound quickly when referenced in complex formulas and conditional triggers.
Step 2 & 3: Deploying Real Text Inputs and Native Password Masking
Traditional prototyping tools rely on static placeholders that merely display pre-scripted text when tapped. ProtoPie circumvents this limitation via its native Input layer, which invites actual keyboard entry.
Navigate to Text ➔ Input and drag an Input layer onto the canvas, nesting it precisely within the username field group.
Align its visual attributes—placeholder text set to "Username," alongside matching background fills and typography.
Duplicate this layer for the password field.
Modify the duplicated layer’s placeholder text to "Password" and adjust its input type parameter to Text Password.
ProtoPie automatically handles character masking (displaying dots instead of plaintext) without requiring custom scripts or logic blocks. At this stage, typing into the fields feels authentic, establishing early psychological buy-in from the test participant.
Step 4 & 5: Establishing Destination Scenes and Basic Navigation
A common sequencing error among novice prototypers is attempting to wire navigation responses before a destination scene exists.
First, establish a blank or fully designed dashboard scene.
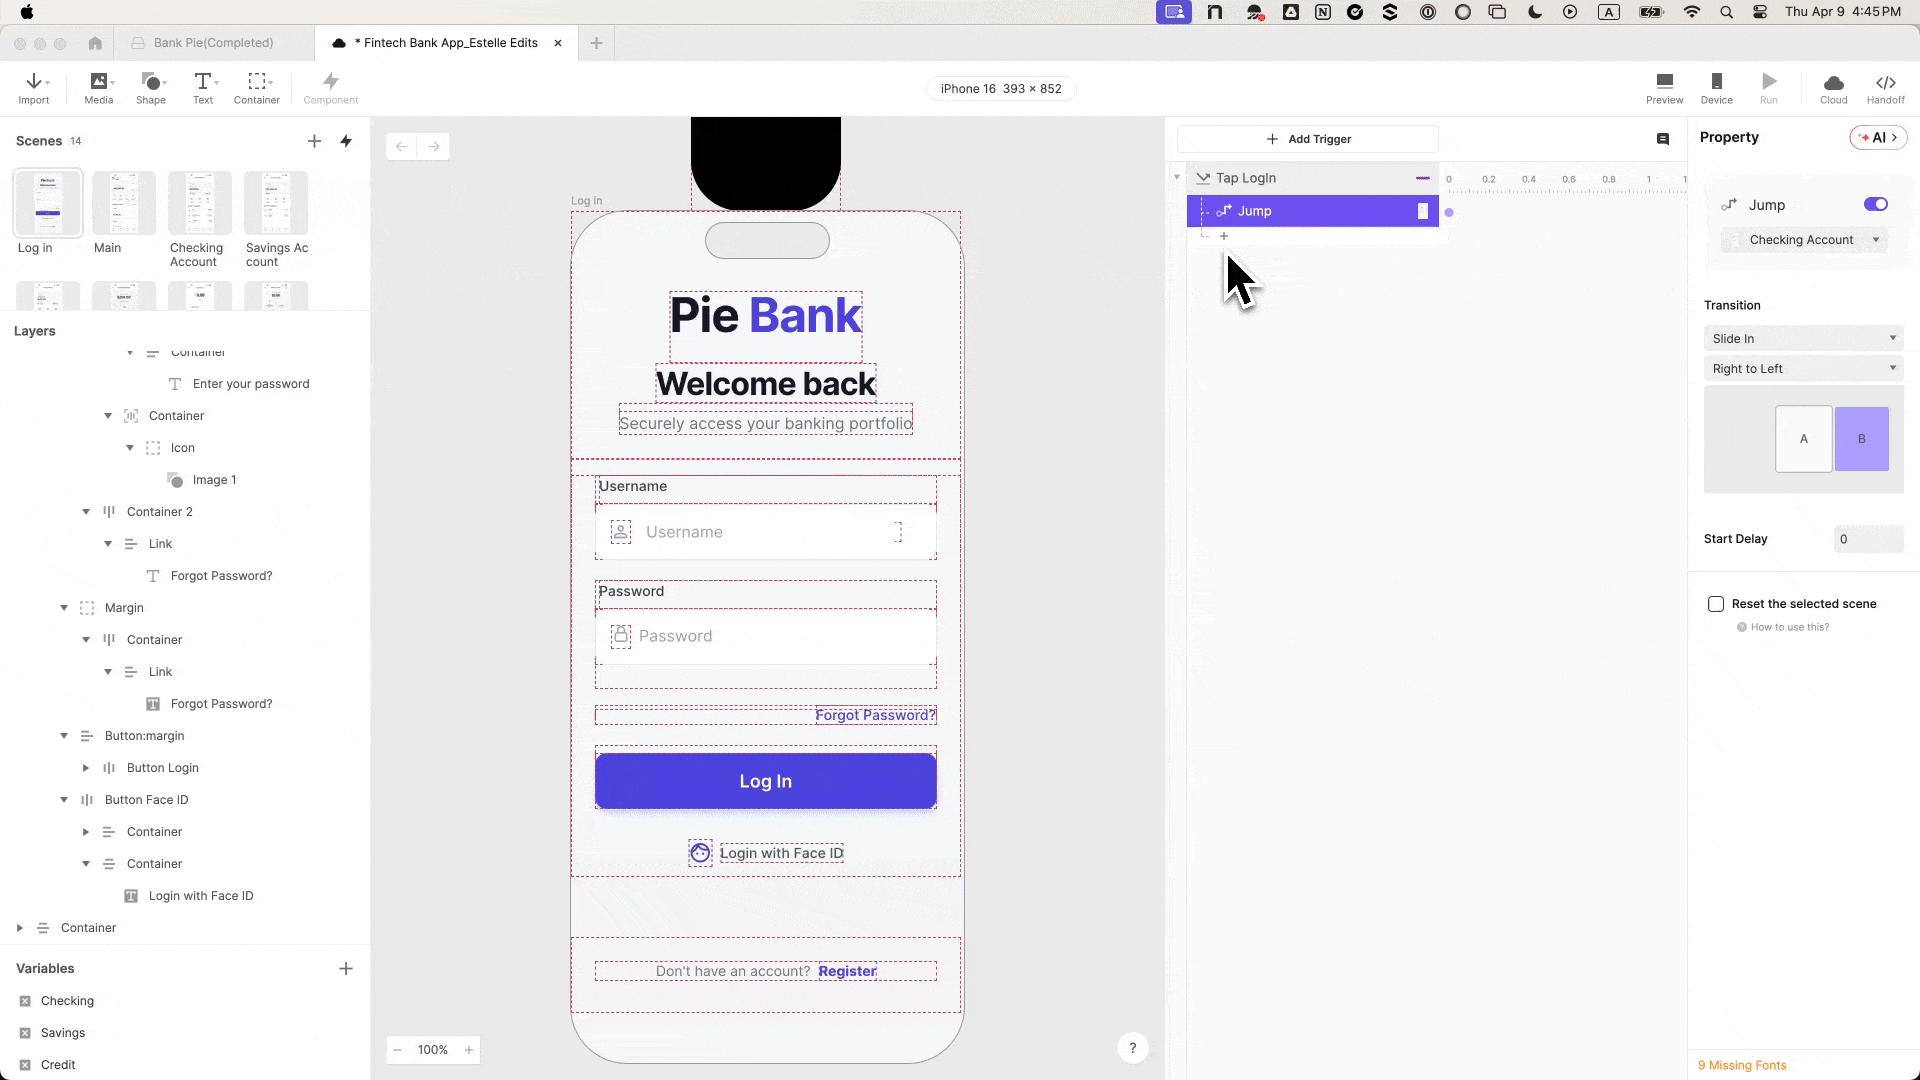
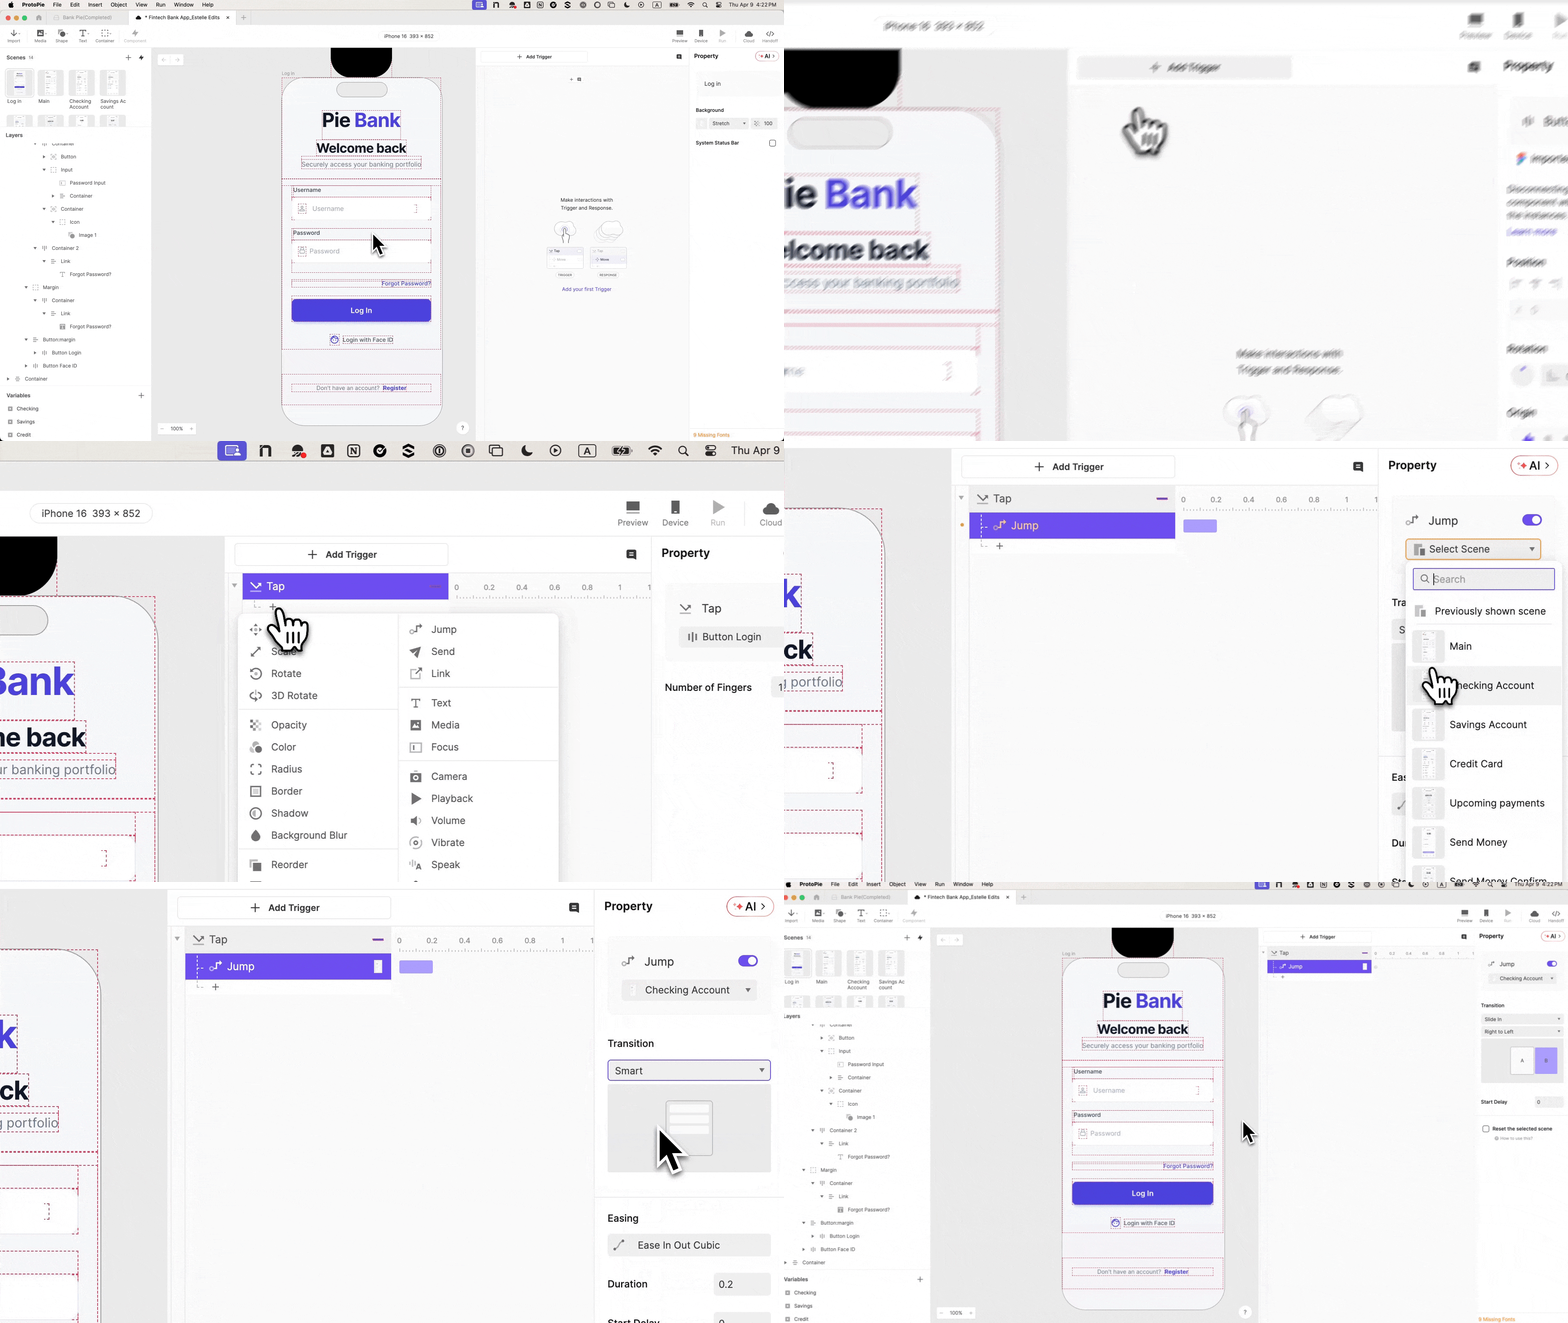
Next, select the primary Log In button, assign a Tap trigger, and couple it with a Jump response directed toward the dashboard scene, complete with a natural Slide in from right to left transition.
The Catch: At this exact step, the prototype is still "lying." Tapping the button successfully navigates the user forward, regardless of what has been typed—even if the fields are left completely blank. Steps 6 and 7 correct this vulnerability.
Step 6 & 7: Implementing Variables and Conditional Logic Gateways
To ensure the prototype remembers what was typed and restricts access to unauthorized inputs, dynamic variables must be introduced.
Variable Binding: In the bottom-left panel of ProtoPie, instantiate two Text type variables: username and password. Bind each variable to its respective input layer using dynamic formulas:
Enabling ProtoPie’s debug icons overlays green visual indicators, allowing designers to view live variable values update in real time as keystrokes are registered.
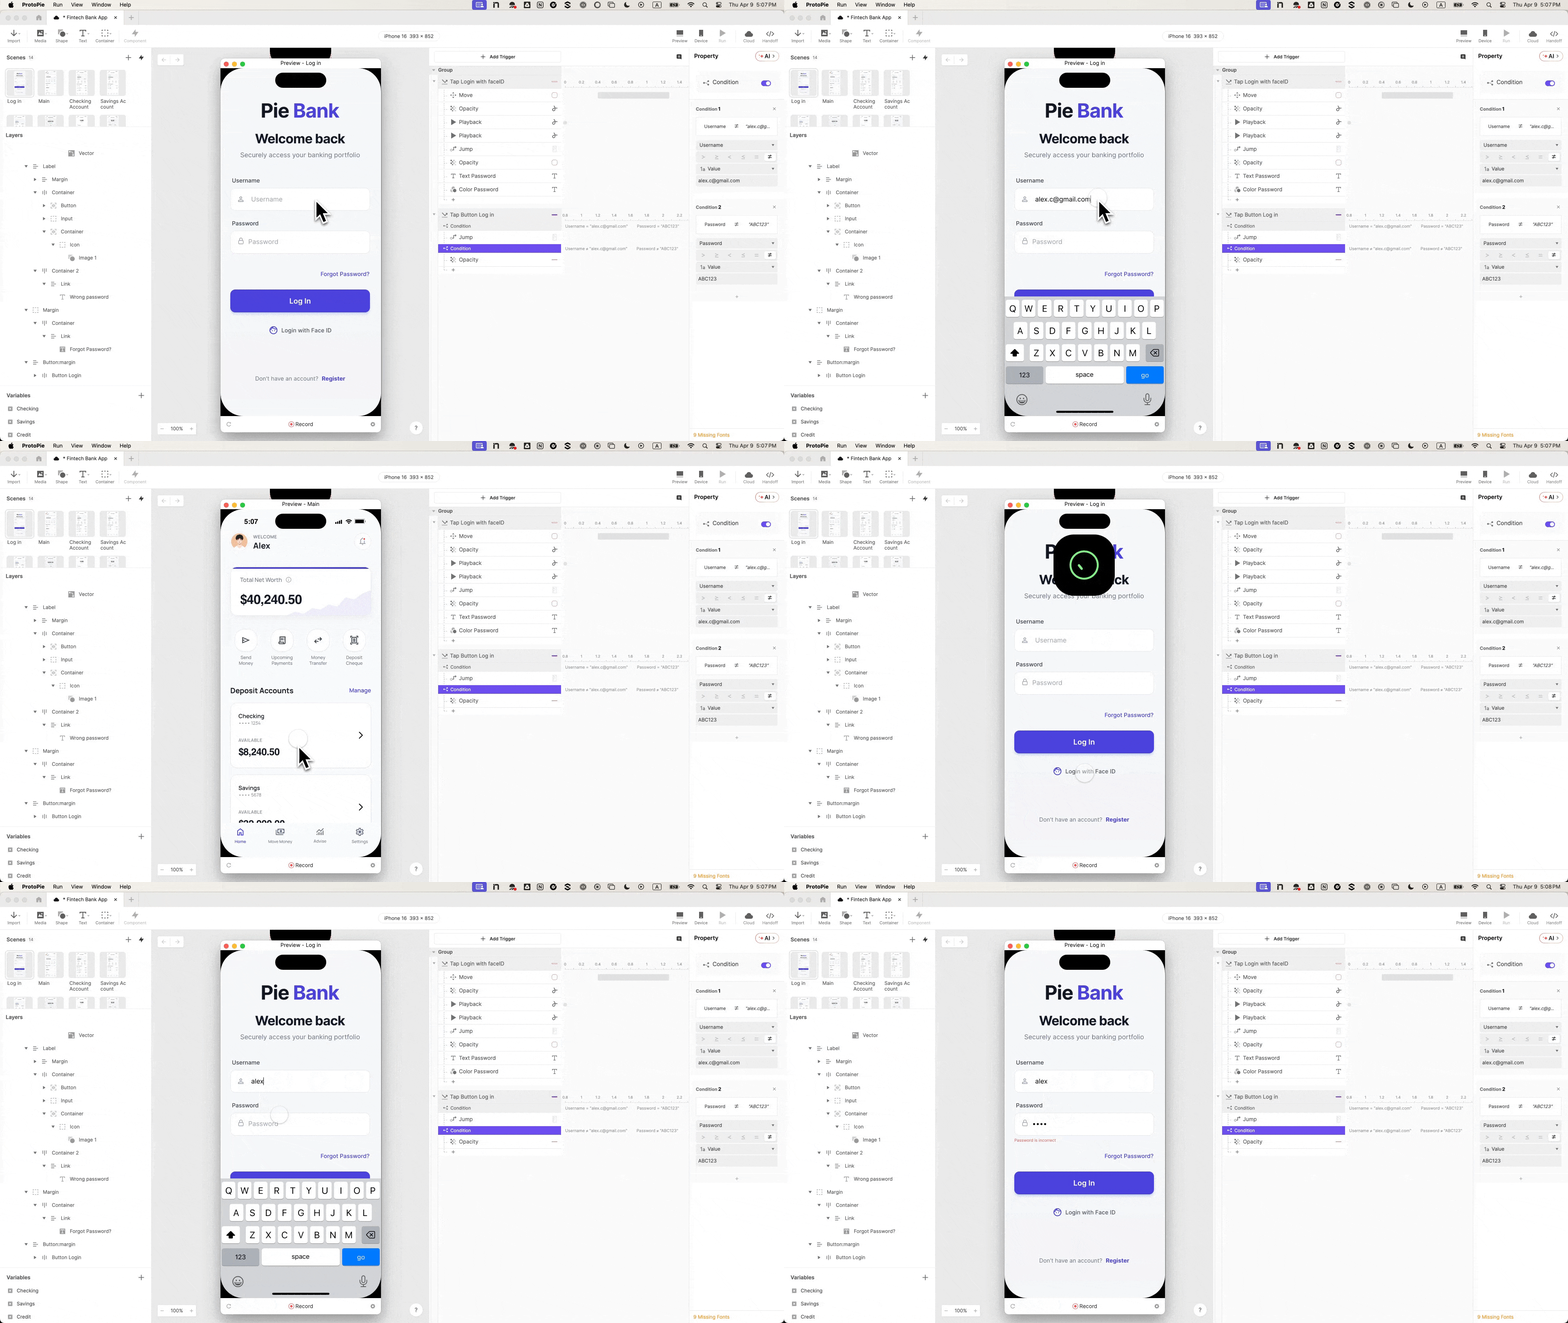
Conditional Enforcement: Return to the Tap trigger on the login button and wrap the behavior in a Condition block containing strict validation rules (e.g., verifying that the username and password match pre-determined strings). Nest the Jump response inside this condition.
Incorrect credentials, empty fields, or improper formats are now firmly intercepted. Participants are forced to engage genuinely with the application interface.
Step 8: Engineering the Live Error State
An authentication flow without error handling is inherently incomplete.
Locate the pre-designed error message layer, rename it Error Text, and set its initial opacity property to 0.
Introduce a secondary, inverse condition tied to the login button tap.
Within this condition, apply a Change Property response that drives the opacity of Error Text to 100.
Now, the prototype branches into two distinct, realistic pathways based on user input: correct credentials propel the user to the dashboard, while incorrect inputs trigger a visible, contextual error message.
To achieve ultimate fidelity, incorporate hardware-level interactions like biometric authentication.
Import a Lottie animation file representing Face ID via ProtoPie’s Media panel, positioning it off-screen above the mobile frame.
On the Login with Face ID button, assign a Tap trigger paired with four sequential responses: Move, Seek, Play, and Jump.
Staggering Timing: Without offsets, all four responses execute simultaneously, causing the scene to jump before the animation has time to render. Apply precise delay values:
Move: 0s delay
Seek: 0s delay
Play: 0.5s delay
Jump: 1.0s delay
Enable the Reset selected scenes parameter on the Jump action to ensure that navigating backward does not leave the Lottie asset stranded off-screen.
The resulting interaction—a biometric prompt that drops into view, executes its scan animation, and transitions seamlessly—is visually and temporally indistinguishable from a native operating system process.
Supporting Context & Metrics: The ROI of Authentication Fidelity
While investing hours into crafting a pixel-perfect login sequence may initially seem excessive for features deeper down the user journey, empirical research across UX laboratories highlights profound down-stream benefits.
Prototyping Approach
Participant Suspension of Disbelief
Validity of Downstream Usability Metrics
Engineering Hand-off Clarity
Low-Fidelity Wireframes
Low (Breaks immediately at login)
Compromised (Behavior influenced by artificial constraints)
Abstract (Relies heavily on verbal interpretation)
Standard Mockups (No Validation)
Moderate (Succeeds until inputs are tested)
Skewed (Users bypass error states entirely)
Partial (Visuals only; logic is unmapped)
High-Fidelity ProtoPie Models
High (Maintained throughout entire session)
High (Captures genuine user hesitation and error recovery)
Comprehensive (Documents exact conditions, variables, and timings)
According to product design metrics collected across enterprise FinTech studies, usability sessions conducted with high-fidelity authentication flows yield a 37% increase in authentic user error recovery observations. When users encounter real-time error states rather than static dead-ends, researchers can accurately measure whether customers comprehend validation error messaging, whether they instinctively retry credentials, or whether they instinctively pivot to biometric alternatives like Face ID.
Official Statements and Industry Insights
Design leaders across the financial technology sector have increasingly emphasized the necessity of bridging the fidelity gap during early-stage validation.
"When a banking prototype skips real authentication, participants don’t simply disengage; they stop mid-session to flag it. The product team walks away with findings that reflect how users behave in a staged demonstration, not how they interact with a living, breathing financial product."
— Leading FinTech UX Researcher(Excerpted from ProtoPie Enterprise Design Insights)
Furthermore, engineering teams frequently report dramatic reductions in friction during handoff phases when prototypes incorporate operational logic.
"When designers hand over a prototype featuring fully realized conditional logic, live variable bindings, and explicit animation timings, developers no longer have to guess intent. The interaction panel acts as a living specification document that bridges design and engineering effortlessly."
— Principal Mobile Engineer, Digital Banking Sector
Future Outlook: The Next Evolution of FinTech Prototyping
As consumer expectations for digital financial services continue to skyrocket, the tolerance for clunky, disjointed testing artifacts is evaporating. The boundary between prototyping and production software is blurring rapidly.
Looking forward, the integration of advanced prototyping environments with generative AI design assistants and real-time backend data mocking will further simplify the creation of hyper-realistic simulations. Yet, the foundational principle remains unaltered: trust is established at the gate.
By prioritizing login fidelity, FinTech teams ensure that participant trust is secured from the very first tap. The dividends of this investment echo across every subsequent phase of product development—yielding cleaner research data, more compelling stakeholder presentations, frictionless engineering handoffs, and ultimately, shipped products that resonate deeply with real-world users.
This article is part of an ongoing exploration into advanced prototyping methodologies for modern financial applications. To explore the underlying mechanics further, practitioners can access and examine fully interactive cloud models like the Pie Bank case studies.